

How To Install Dstv In Ghana
We decided to come up upwards with a complete DIY guide for installing or setting upward a satellite dish & decoder for DSTV, MyTV, Multi TV & etcetera by following afterwards a uncomplicated tut.
This idea was birthed after we recently installed i for a student who complained of having not even half our installation fees. We ended that a guide like this tin help a lot of persons install their satellite dishes without a bug of whatsoever kind.
Following this guide step past footstep will help you install and set your satellite Tv dishes without the usual missing channels, poor signal, and related problems that happen every bit a result of depression technical know-how for installing satellite dishes.
Nosotros strongly propose you to ignore this if you lot take a phobia of learning new stuff or non a big fan of do-information technology-yourself (DIY) guides. It can come in handy for new installations, adjusting dish positions, or when relocating to a remote area.
Tools Needed
- The Satellite dish and components (ie. Reflector, Lnbf, and Decoder. They are usually sold together).
- A proficient hammer.
- four Pieces of iii-inches nail
- I parcel of cable clips (the one with nails)
- 10/thirteen, and 14/15 combination, flat or ring spanner(due south)
- A cutter (or electric pliers)
- A Black Solution Tape (sellotape).
- A Screwdriver
- F connectors (a minimum of two) and Coaxial cables (ane total roll of Coaxial cable is virtually NGN1,000, $nine)
- A 4663x or 4669x Strong decoder (special digital satellite signal meters for installation tin can come in handy for this, but nosotros used a strong decoder and so volition be using it for references throughout this tutorial). You can buy inexpensive digital satellite signal finding meters online. Either from here, hither, or any of the top online shopping malls with reputable sellers.
Extra Tools
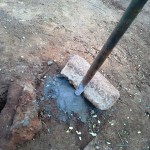
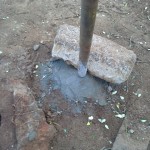
This office is necessary if you are going to apply a pipe and not the house roof, wall, or wooden fetcher lath before the roof.
The pipe must be stock-still on an open infinite without trees and/or other hindrances. Beneath is the tools necessary for mounting your satellite dish in an open up infinite outside the building or with a longer pipe.
- A cup of Cement mixed with stones
- a trowel
- Cutlass or shovel (for earthworks of the hole)
- A pigment of sand and a bucket of water
How to Setup the Satellite Dish
The satellite dish components will usually come in carve up parts and must be arranged in such a way that makes it easy to receive signals and withstand strong air current.
The organization of the dish components depends on where yous intend to mount it. If you are going to mount information technology on a root, wall, or wooden fetcher board of the building, look at the image below for how it should be coupled.
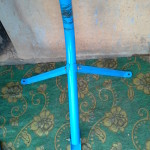
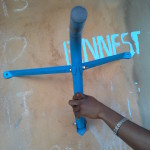
If you intend to mount it on a pipe exterior the edifice, wait at the paradigm below and utilize the tools listed in the extra tools section above to brand it solid and well-grounded.
The concluding affair needed to complete this section is to fit in the screws and basics in the reflector's (dish) rear and connect the LNBF accordingly. See the images below for the tips.
After mounting your satellite dish correctly, you can safely move ahead to the side by side and concluding steps covered below.
Related Tips:
- Download Tv on Computer Free
- Sybla Tv Review: Watching Live Tv, Matches On android
How to Configure the Decoder, Actuate smart carte du jour and free-to-air channels for first viewing
This is the role where your digital satellite signal meter will come up into play. Plug the Coaxial cablevision into the Lnbf base of the chief dish assembly and then plug the other end of the cablevision into the LNB in (Antenna) port in the back of a digital satellite signal meter or a potent decoder.
Complete the second role also known equally dish alignment by locating due east, westward, points, and degrees depending on the satellite tv provider y'all intend doing the setup for.
Do note that for this tutorial, we used a stiff decoder (as a digital satellite signal meter) to install a DSTV satellite dish and so connected the lnbf cable to the DSTV decoder to watch all the channels available for our selected plan.
The angular position, polarity, and transponder frequency values for the popular satellite TV providers are listed beneath for your learning.
Orbital Position & Frequencies of Pop Digital Satellite Boob tube Providers
For Multi Television set (Joy TV): Use –
- TURK Sabbatum
- Orbital Position – EAST
- Transponder Frequency: 12553, 12525, or 12522
- Symbol rate: 19531, 27500, or 27000
- Polarity: Vertical
OR
- Astra2F
- Orbital Position: 28.2°, 28.5°, or 26° Due east
- Transponder Frequency: 11595
- Symbol Rate: 30000
- Polarity: Horizontal
- Dish Size: 1m or 100cm dish
For DSTV: Hereunder is what to use for DSTV transponder frequency and symbol rate. Merely Use –
- EUTEL Sabbatum W4 or Eutelsat W7
- Orbital Position – EAST (@ 36 degrees)
- Transponder Frequency: 11842, or 12245, 11728, 12284, 11900, or 11747
- Symbol rate: 27500
- Polarity: Horizontal
Note that this particular setting works for High TV, Train Television set & most other sports channels satellite providers.
For My Tv set: Use –
- INTEL Sat, 7.ten/K
- Orbital Position – Westward
- Transponder Frequency: 10986
- Symbol charge per unit: 26657
- Polarity: Vertical
For CanalSat Afrique: Use –
- Orbital Position – East
- Transponder Frequency: 12722
- Symbol charge per unit: 30000
- Polarity: Vertical
For HotBird: Utilise –
- Orbital Position – EAST
- Transponder Frequency: 11881
- Symbol rate: 27500
- Polarity: Vertical
For Nile Sabbatum: Use –
- Orbital Position – West
- Transponder Frequency: 10.990 or 10.993 or 12.130
- Symbol rate: 27500
- Polarity: Vertical
Scanning for Satellite Idiot box Channels & Completing the Setup
This is the concluding step for installing a satellite dish yourself: Once the polarity, orbital position, and transponder values for your chosen satellite provider is noted, motility on to this step to complete the channels scan and full activation.
From your strong decoder remote control, detect Menu and so select installation . Enter 0000 as the password and Select manual scanning and then enter your satellite provider'southward values as listed higher up Eg. Eutelsat w4/7, transponder frequency, symbol rate, and the rest.
For Dstv we did the setup every bit follows:
- We selected Eutelsat w4/7
- Under frequency, we put 12245
- Nether symbol rate, nosotros put 27500
- Nether polarisation, we put H
At this bespeak, the betoken power and the quality meter will start reading, outset rotating your reflector (dish) up/downward and sideways around 36 degrees east (see your neighbors own for tips or read directly from your digital satellite signal meter).
Sentry the signal power and quality and tight the dish strongly one time you lot are able to get values college than sixty% (Nosotros got 89% for ours). Once a practiced betoken quality is ascertained, your satellite dish is all setup.
Disconnect the LNB-in from your strong decoder (or digital satellite meter) and connect it to the DSTV decoder. Select English from the language options, E36A-B from the next window, and Universal for LNB type. Hit browse to install and complete the channel setup.
Note: If yous are using a digital signal meter, the scan option won't exist necessary. All you need to do is: Connect the LNB-in to the meter and enter the frequency, polarization, and symbol charge per unit values while aligning the dish for the best signal quality.
DSTV Gratis-to-air Channels
Once your DSTV satellite dish is installed correctly, the following channels will evidence in clear qualities as they are complimentary-to-air channels for all DSTV satellite dish owners.
- Channel 100
- Channel 198
- Channel 409
- Channel 447
- Aqueduct 449
How to activate a DSTV Smart Card for Showtime Use
If yous are activating your DSTV smart bill of fare for the first time, you will need to buy a subscription program. All DSTV bouquets are listed here.
Insert your smart card and have note of the smart card number. Call 012703232 or 08039003788 to set up your account or dial *288# to follow the USSD prompt.
What if there'southward the E16 Error Code?
This is a very common error with activating new accounts, you can right this error if, after 30 minutes of activation, your subscribed (premium) channels are even so to testify up.
You lot can correct the E16 error by sending reset plus your smartcard number (eg. reset 1234567890) as an SMS to 30333 or past using the clear error code – E16 choice on the self-service section of the DSTV website.
DSTV Satellite Dish Bespeak Troubleshooting Tips
This is an of import update for those asking for help on how to properly position their satellite dishes subsequently relocating from their erstwhile residence and/or when the dish position gets tampered with by kids playing within the environment.
This section would as well come in handy for those experiencing very poor reception, distorted audio, and poor visual rendition.
Hither, y'all won't be needing a digital meter or strong decoder as the built-in bespeak tuner function that comes with DSTV satellite dish decoders will suffice.
What y'all need to do is this-
- Position your TV in such a mode that- information technology can be viewed clearly while turning the satellite dish. You'll need to have it outside in well-nigh cases or inquire someone else to await at the Goggle box and give yous updates while you play around with the satellite dish positioning to various angles.
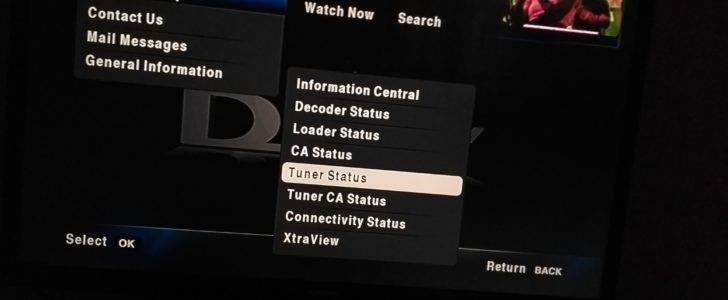
- Turn on the unabridged system and press the Help push button on your remote control.
- Scroll down to general information and and so Tunar Status to your right.
- Click the Tuner status and use that to set your satellite dish for the best commitment. Anything between threescore and 98 is perfect and would be hardly disturbed by pelting and/or poor weather.
Hither's a short video to assistance you locate this menu choice with ease.
Bonus Tip
How to Record Television receiver Shows, FM Radio and Satellite Programs
DSTV Explora hardware and some other premium satellite TV decoders let you tape events and programs for future viewing, but if you are using the HD version that doesn't requite such privileges, you can use this section for tips on how to record Boob tube programs for future viewing.
- Select the device to employ (for this guide, I'll be using a PC. Note that at that place are such enhancement for smartphone and tablet devices)
- Get a USB Boob tube tuner box/stick (assuming you don't have one already). Y'all can purchase information technology from Amazon INC. by following this link or from their listing page hither. There are cheaper models of USB TV tuner stick on Aliexpress besides, y'all can buy one of those from this page. (Note that older desktop computers use the PCI component for Idiot box tuning, at that place'southward likely the chance that yours has i already for second-mitt buys).
- Connect the USB TV stick to your PC so, connect the RCA from the decoder to it or utilise the RF-out to sync between your regular Tv set and USB Idiot box card.
- Install the USB Boob tube box software and support drivers.
- Select any aqueduct of your choice and hit tape to save for future viewing. You tin can tape FM stations and similar programs as long every bit they work on your PC.
Note: You tin record both satellite TV programs and regular TV shows with this guide. Yous can also use your regular TV cards (for desktop computers) to record alive TV shows by upgrading the back up software to their latest version.
Your Turn
Looking for a DSTV installation guide PDF? Yous tin get a PDF version of this Satellite TV installation tutorial by clicking here. This will make it super piece of cake for you to look through it when offline.
We ask that you share this page with your Nigerian, Ghanaian, Southward African, or Kenyan friends that are big fans of DIY Sat Idiot box tutorials . We are opened to technical questions on satellite Television set installation, suggestions, or more tips on troubleshooting satellite TV networks.

Source: https://www.3ptechies.com/how-to-install-dstv-satellite-dish.html
Posted by: edwardsgeoll1980.blogspot.com
0 Response to "How To Install Dstv In Ghana"
Post a Comment